
How to read your gas and electricity meters
There are 2 main types of gas and electricity meters: smart meters and traditional meters. Smart meters are the newer type of meter that send your meter readings for you.
If you have a smart meter, you’ll usually only need to send a meter reading if:
You’re a new customer
A technical issue stops your meter readings being sent
Your smart meter was installed recently
Read more about smart meters and how they work in our handy guide.
If you don’t have a smart meter, you’ll need to send us regular meter readings to make sure your bills are accurate. Read on if you need help working out which type of meter you have. These are the meter types we'll cover:
How to read your traditional electricity meter
How to read your traditional gas meter
How to read your smart electricity meter
How to read your smart gas meter
If you’ve got a smart meter you’ll usually have a portable device called an in-home display (IHD), which helps you see how much energy you’re using.
What kind of energy meter do I have?
Electricity and gas meters come in all shapes and sizes! So before we get into the practicalities of meter reading, here’s how to work out which type of energy meter you have.
Traditional (non smart) meters
Any meter installed before 2011 will definitely be a traditional meter, as that’s when the smart meter roll out began. But traditional meters were still widely installed up to about 2017. If your meter has dials, or a display with 4 to 6 black, white and red numbers, it’s very likely you have a traditional, non-smart meter.
Smart meters
Smart meters are the new generation of electricity and gas meters. They send readings to your supplier automatically using a secure wireless network. If you’ve got a smart meter, you’ll usually have a portable device called an in-home display (IHD) which helps you see how much energy you’re using. If you log into your online account, you’ll be able to see if your meter is a smart meter.
Multi-rate meter
If you’re on a plan like Economy 7 that gives you different prices for your electricity between day and night, you have a multi-rate meter. You’ll need to take 2 readings from it. Some multi-rate meters have 2 displays, showing your different rates. Others have a button you need to press to switch between the 2 readings.
Different makes and models of meter use different terms for the 2 rates. Here’s a table to help you know which reading’s which.
| Pricier "peak" rate | Cheaper "off-peak" rate |
|---|---|
| Day rate | Night rate |
| Normal | Low |
| Rate 1 | Rate 2 |
You can get smart and traditional multi-rate meters.
Pay As You Go meters
You pay for your energy before you use it with a Pay As You Go (or Prepayment) meter. In short, they work like a pay-as-you-go phone – you buy credit for your meter, and top up whenever you need more. Read about them in our help centre.
Pay As You Go meters can be traditional or smart. If you have a traditional Pay As You Go meter, you top it up using a card, token, or key. You take this to your local Pay Point, Payzone shop or Post Office.
Smart Pay As You Go meters can be topped up online or using our OVO app, so you can easily top up on the go.
How to read your traditional electricity meter
Let’s start with how to find your electricity meter. Electricity meters are usually on an outside wall, inside a porch or entrance hall, or inside a cupboard in a living room. You could also find it in a basement, utility room, or garage. If you know where your consumer unit (fuse board) is – there’s a good chance your electricity meter is near it.
There are several types of traditional electricity meter, and you read them in different ways. It could have a standard (mechanical), dial or digital display, be a multi-rate meter or a Pay As You Go meter.
How to read a standard (mechanical) or digital electricity meter
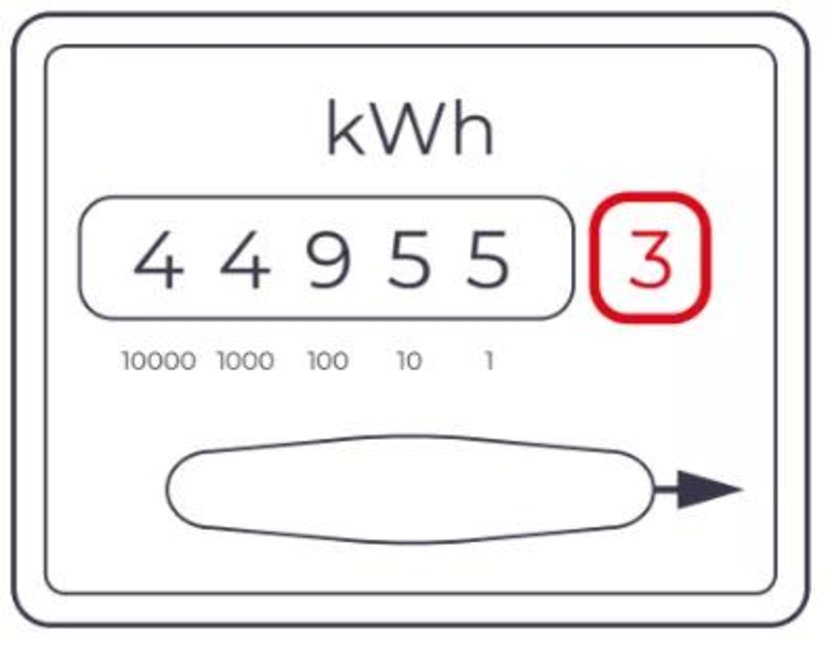
Pretty simple! Just write down all the numbers you see, from left to right
Ignore any numbers in red, or in a red box
And ignore any numbers after a decimal point
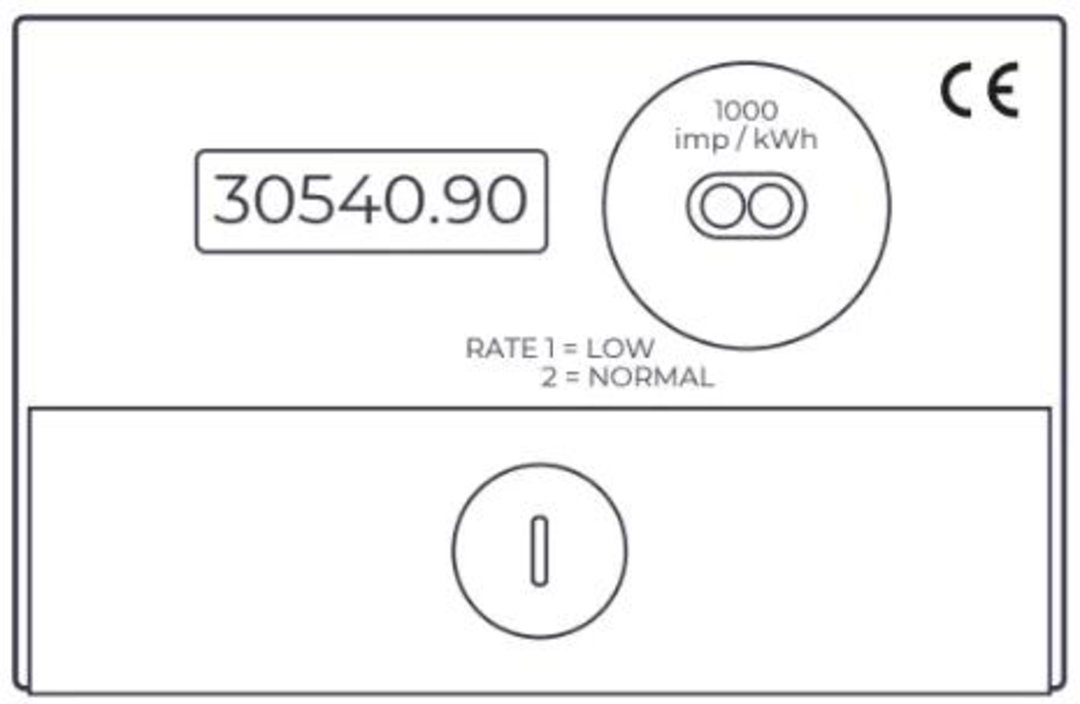
So, the readings for the meters above would be 44955 and 30540.
How to read a multi-rate electricity meter
If you have a multi-rate plan, with lower-priced off-peak electricity (like economy 7), you’ll have more than one reading on your meter.
If you have a standard mechanical meter, there’ll be 2 rows showing your readings. But if your meter has a digital display, you’ll just need to press a button to scroll through the different rates.
To read a multi-rate digital meter:
Press the button to switch between rates.
Make a note of the day rate and the night rate, ignoring any numbers after the decimal point.
Next to the reading, there’s often a smaller 1 or 2 to show which rate is which (2 for the peak or day rate; and 1 for off-peak or night). If you’re not sure which is which, check your last meter readings on your bill.
In the example above, there’s a sticker on the meter to show which rate is the low (or night) rate and which is the normal (or day) rate.
If you’re not sure when your peak and off-peak times start and stop, find out in your online account.
How to read a dial electric meter
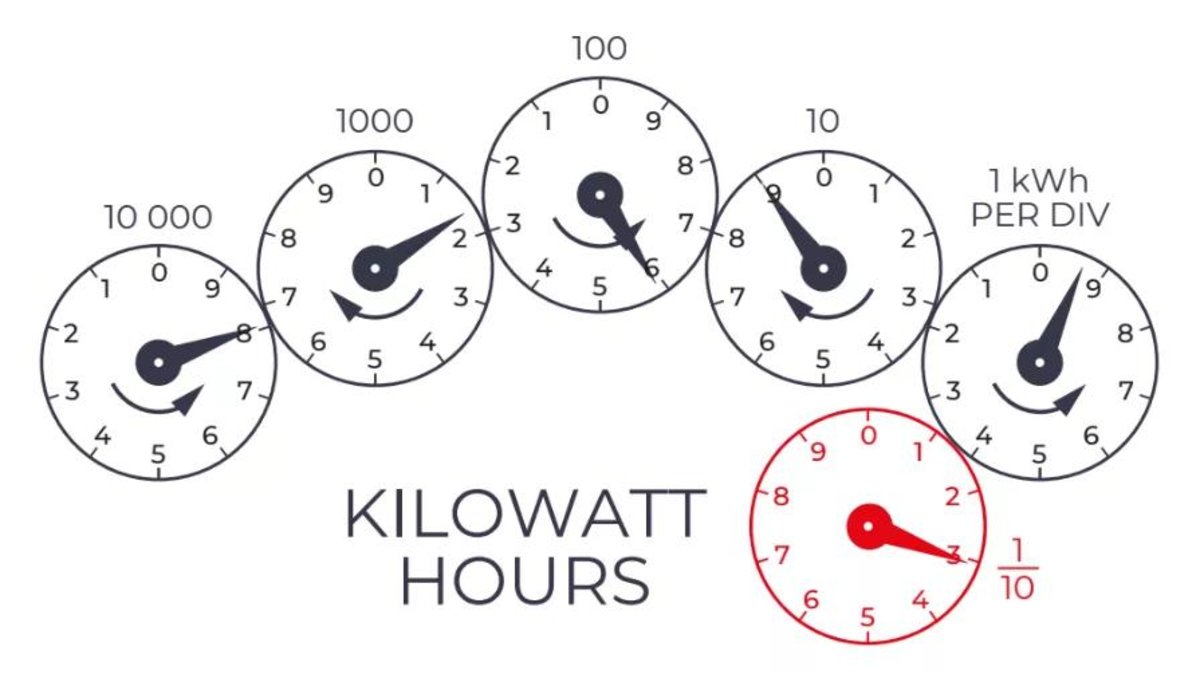
Dial meters are slightly trickier. Each dial turns in the opposite direction to the one before. So first, check the direction of your dials. They might not be exactly like the example above. Every dial on every meter is numbered from 0 to 9.
The pointer always moves upwards, from 0 through to 9, and then around again to 0. We always take the reading from the number the pointer is on, or has just passed, not the number it’s moving towards.
To read your dial electric meter:
Start with the highest-numbered dial first (in this example, the dial is 10,000 and the reading is 8).
Then work your way through the other dials from left to right, including any zeros.
If the pointer is directly on a number, write it down.
If the pointer falls between 2 numbers, write down the lower number. (Remember, the pointer hasn't reached the higher number yet.)
When a pointer falls between 9 and 0, write down 9. Reduce the reading you've already taken for the dial to its left by 1, since the pointer won't have reached that number, even though it’s very close. For example, in the picture above, if you wrote 8159_, when adding the next digit you’d need to correct it to 81589.
Ignore any red dials/numbers in red.
In this example, the correct reading is 81589.
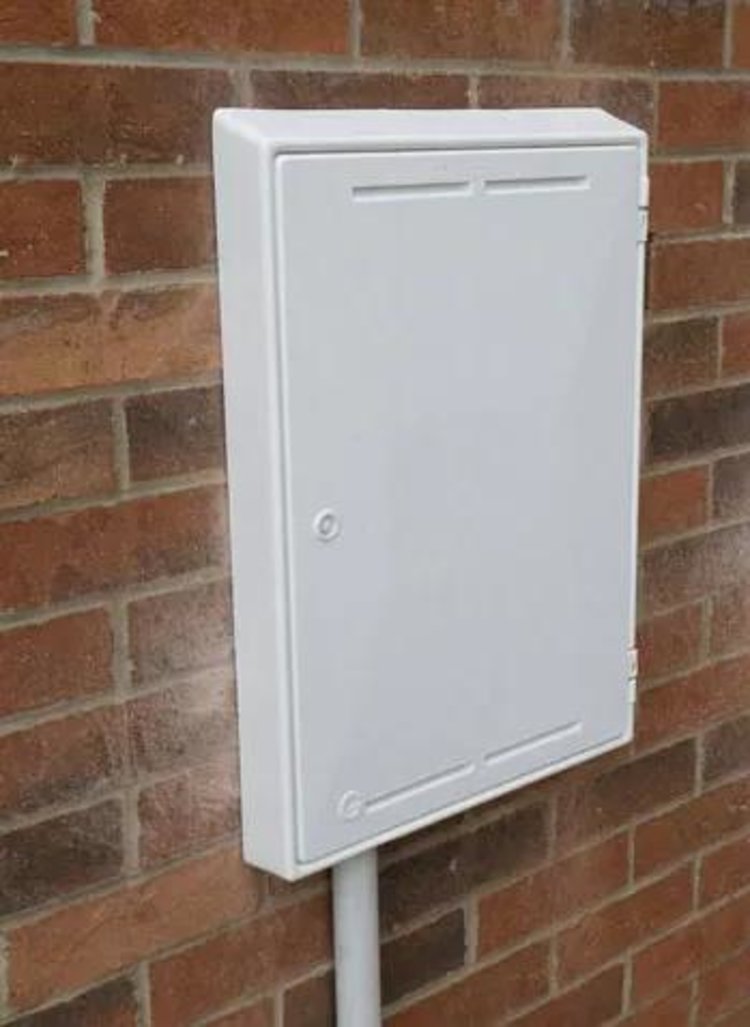
How to read your traditional gas meter
First of all, where is your gas meter?
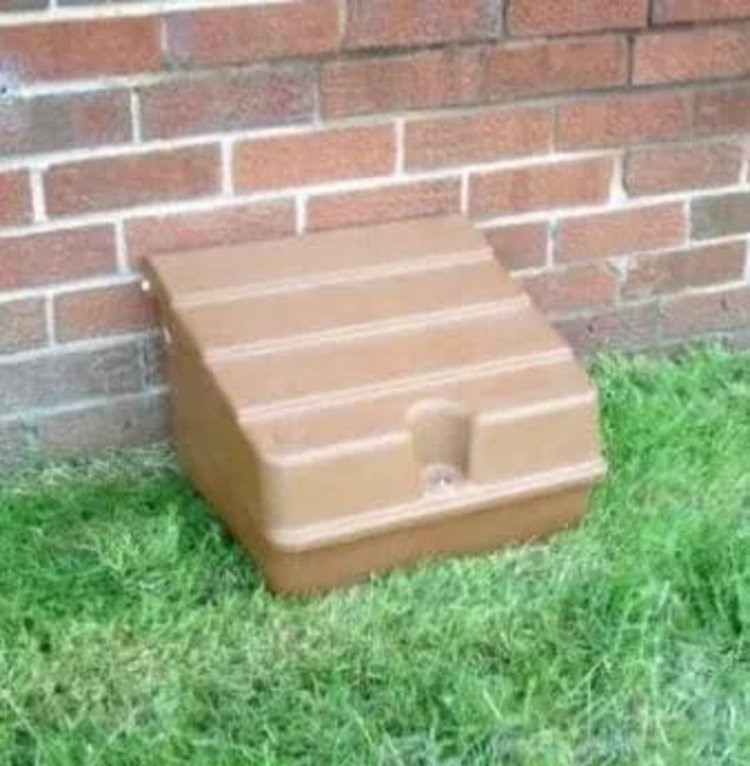
This isn’t a silly question! You’d be surprised how many of us don’t actually know. In most homes, the gas meter will either be in the kitchen, hallway or outside in a cupboard or meter box. If you live in a flat, the meters for your building might even be all together in a special meter room or in a box outside.
Make sure you find the right one for your home! It should be clearly labelled – but if you’re having trouble, check with your landlord or letting agent.
Gas use is calculated in 2 different ways. Older meters measure in imperial (with usage calculated in cubic feet) and newer meters work in metric (with usage calculated in cubic meters).
How to read a digital metric gas meter
Digital metric gas meters have 5 main numbers, and will often have M³ on the front, or say “cubic metres”.
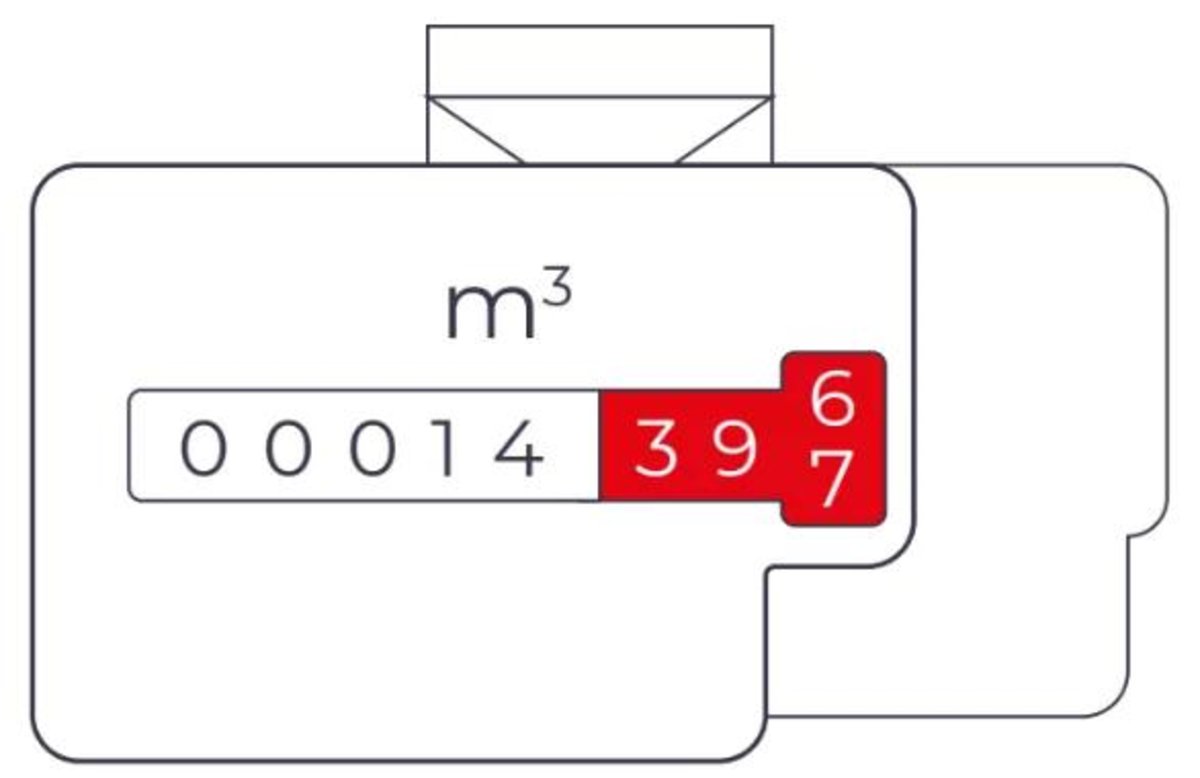
To read your gas meter:
Read the 5 numbers from left to right, in the order they appear, including any zeros
Ignore any numbers in red, or in a red box
Ignore any number after a decimal point (sometimes shown in red)
In this example, the meter reads 00014
How to read a digital imperial gas meter
Digital imperial gas meters have 4 main numbers, and will often have ft³ on the front or say that it measures in “cubic feet”.
To read your gas meter correctly:
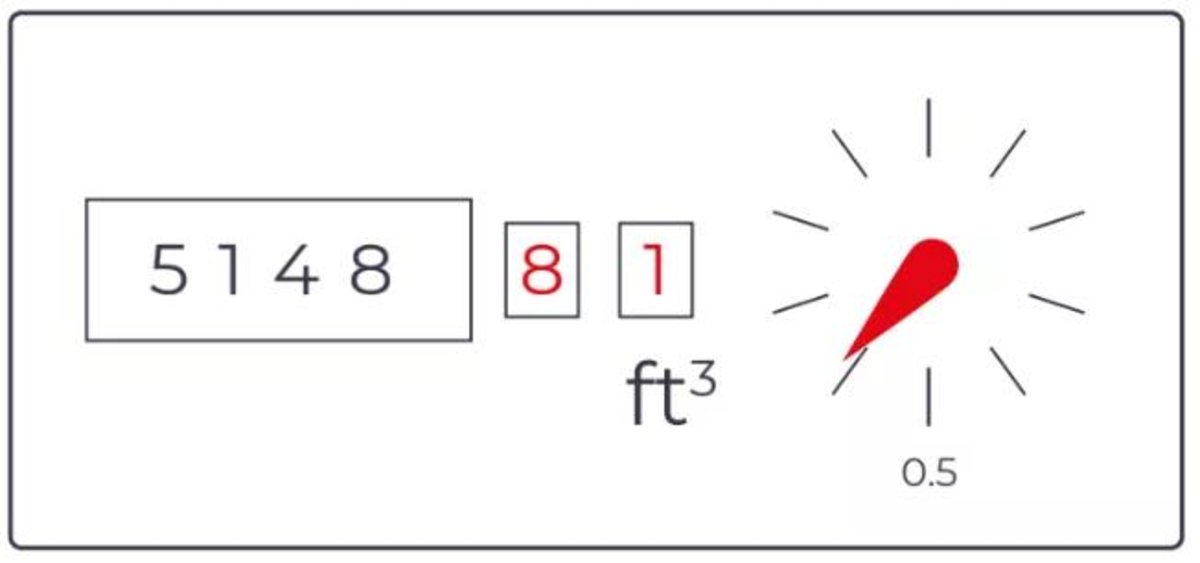
Read the 4 main numbers from left to right, in the order they appear, including any zeros
Ignore any numbers in red, or in a red box
Ignore any number after a decimal point (sometimes shown in red)
In this example, the meter reads 5148
How to read a dial gas meter
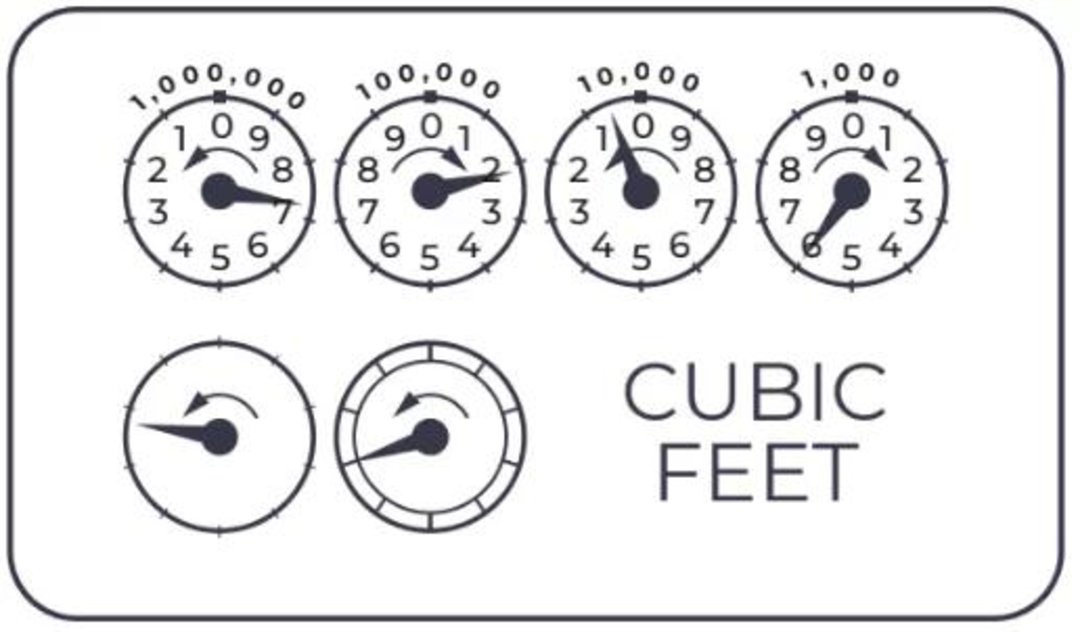
Each dial turns in the opposite direction to the one before. So before you take a reading, check the direction of your dials. Every dial on every meter is numbered from 0 to 9.
The pointer always moves from 0, counting upwards to 9, and then around again to 0. We always take the reading from the number the pointer is on, or has just passed, not the number it’s moving towards.
To read your dial gas meter:
You might see 4 or more dials – but you only need to read the 4 main ones.
Start with the highest-numbered dial first (in this example, the dial is 1,000,000 and the reading is 7).
Then work your way through the other dials from left to right, including any zeros.
If the pointer is directly on a number, write it down.
If the pointer falls between 2 numbers, write down the lower number. (Remember, the pointer hasn't reached the higher number yet.)
When a pointer falls between 9 and 0, write down 9. Then you might need to take 1 away from the reading you've already done for the dial to its left (the pointer won't have reached that number, even though it’s very close). For an example, see the explanation on How to read a dial electric meter above.
Ignore any red dials/numbers in red.
In this example, the correct reading is 7205.
How to read your smart electricity meter
This depends on the type of smart meter you have. Here’s how you read the 4 types of meter that we usually install.
How to read an Aclara SGM meter
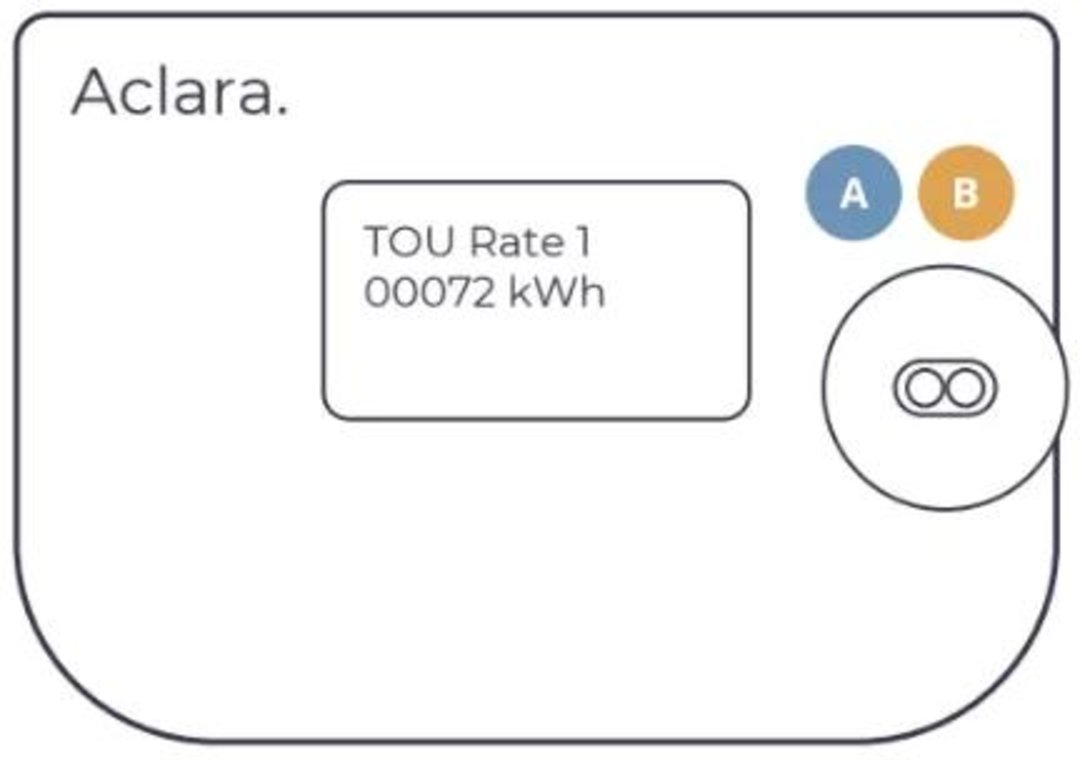
Press the blue “A” button a few times, until you find a screen labelled “TOU Rate 1”
Then take down the reading
If you have a 2 rate plan, keep pressing the button until you see “TOU Rate 2” and note down that reading as well.
How to read a Landis & Gyr E470
You can see your reading on the display screen.
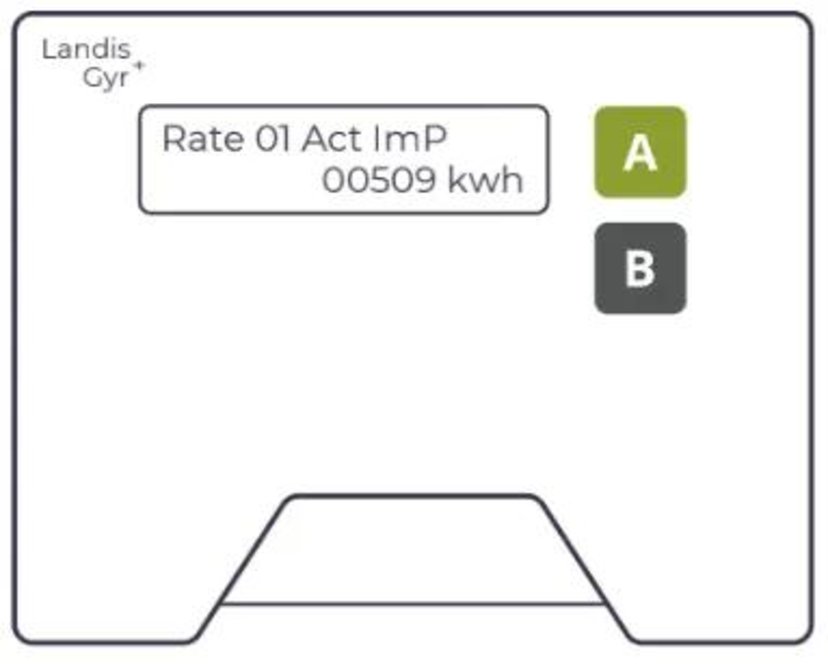
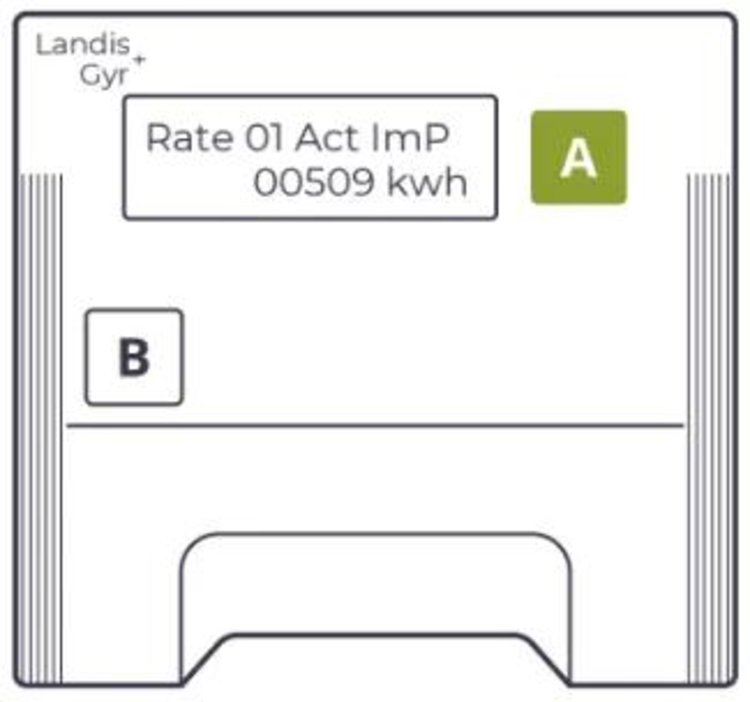
If you’re on a 2-rate plan, like Economy 7, you’ll need to give 2 readings.
Here’s how to read a multi-rate Landis & Gyr meter:
Press and hold down the “B” button for 3 seconds.
Then press the “A” button to cycle through “Rate 01” and “Rate 02” and make a note of both readings.
If you’re not sure which reading is which, you can compare them to your last readings on your online account. Or read your meter twice, a few hours apart, during the daytime – the reading that changed is your day rate.
How to read an EDMI ES-10 meter
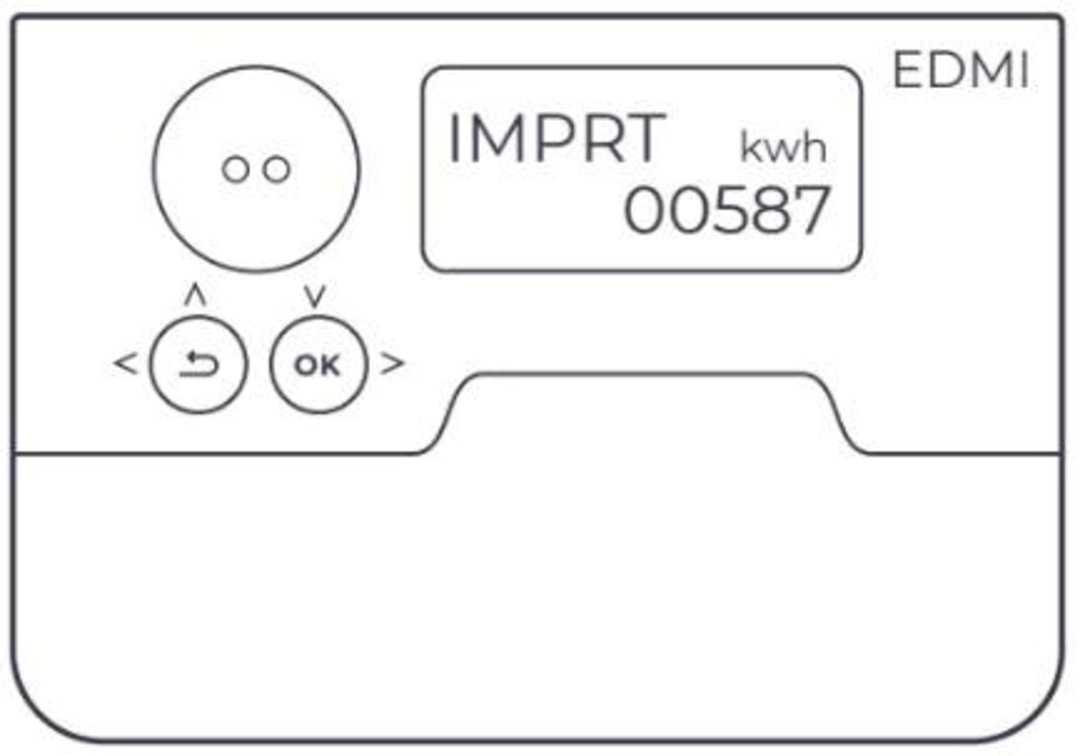
To read your meter, use the left and right buttons to scroll to the screen labelled “IMPRT”. This is your meter reading.
If you’re on a 2-rate plan, like Economy 7, you’ll need to give 2 readings. Here’s how to read a multi-rate EDMI ES-10 meter:
Press and hold the right “OK” button for 2 seconds – the screen will say ”Billing”
Then press and hold the right “OK” button again – now the screen will say “My bills”
Press the right button again until the screen says “Advanced”
Then press and hold the right button and it will say “TOUMTRX”
Press and hold again, until the screen shows “RT1” – this is your rate 1 reading
Use the left and right buttons to scroll to “RT2” for your rate 2 reading
How to read a Kaifa MA120 meter
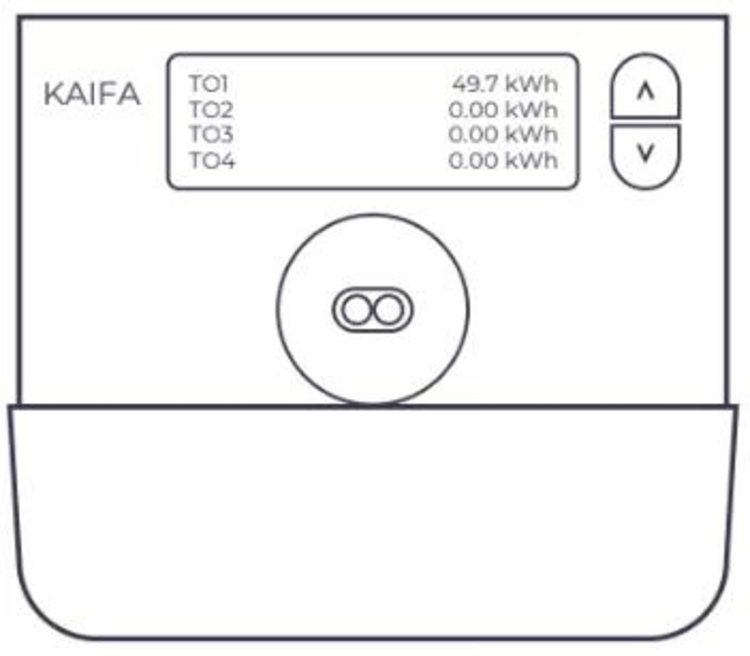
You don’t need to push any buttons – the meter automatically scrolls through a few screens. Your reading is on the screen with “+A Value” at the top left corner.
To read your Kaifa MA120 on a multi-rate plan:
Press the up button until you see a menu with “General Display” as the top option.
Press and hold the top button until the next menu appears.
Use the bottom button to scroll down to “Tariff matrix”.
Then press the top button to select this, and you’ll see a menu with “TOU Register” as an option.
Press and hold the top button to select “TOU Register” and you’ll see a list of 4 rates (some might be blank). Your readings are the ones with numbers against them.
If you’re not sure which reading is which, you can compare them to your last readings on your online account. Or read your meter twice, a few hours apart, during the daytime – the number that’s changed is your day rate.
How to read your smart gas meter
How to read a Flonidan G4SDZV-2

Push any button to wake up the display. Your reading will be on the first screen you see.
How to read a Landis & Gyr G470 672
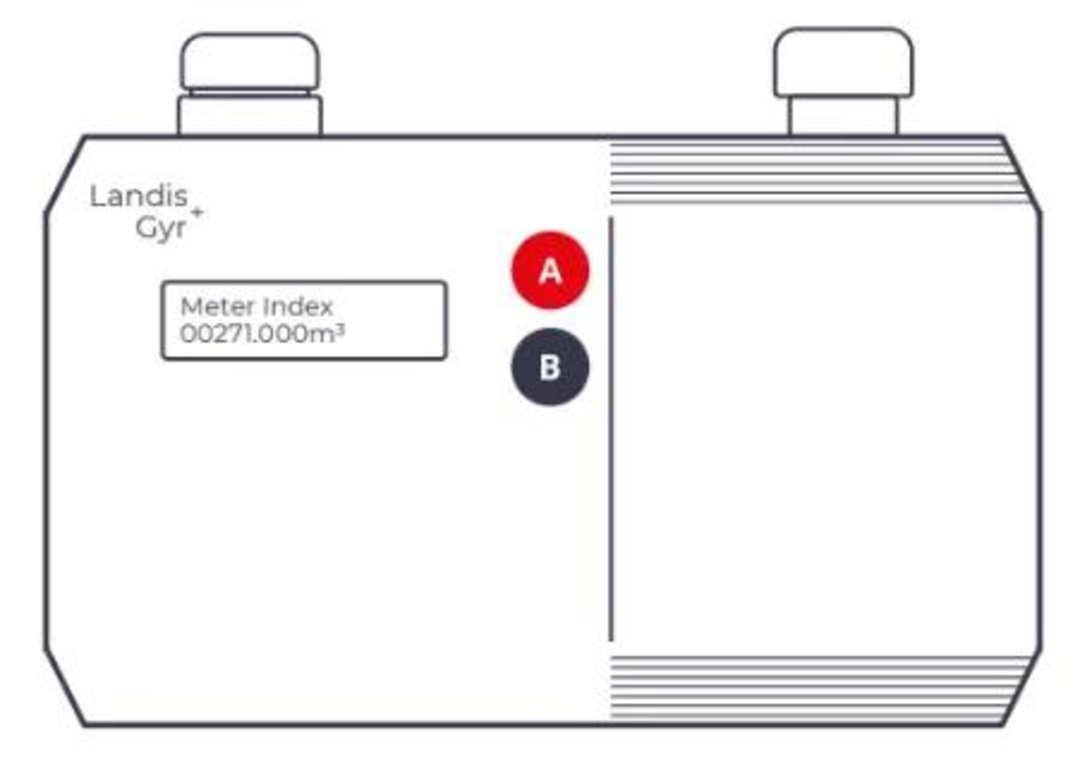
Push the “A” button to wake up the display. Your reading will be on the first screen you see.
How to read an EDMI GS-60B
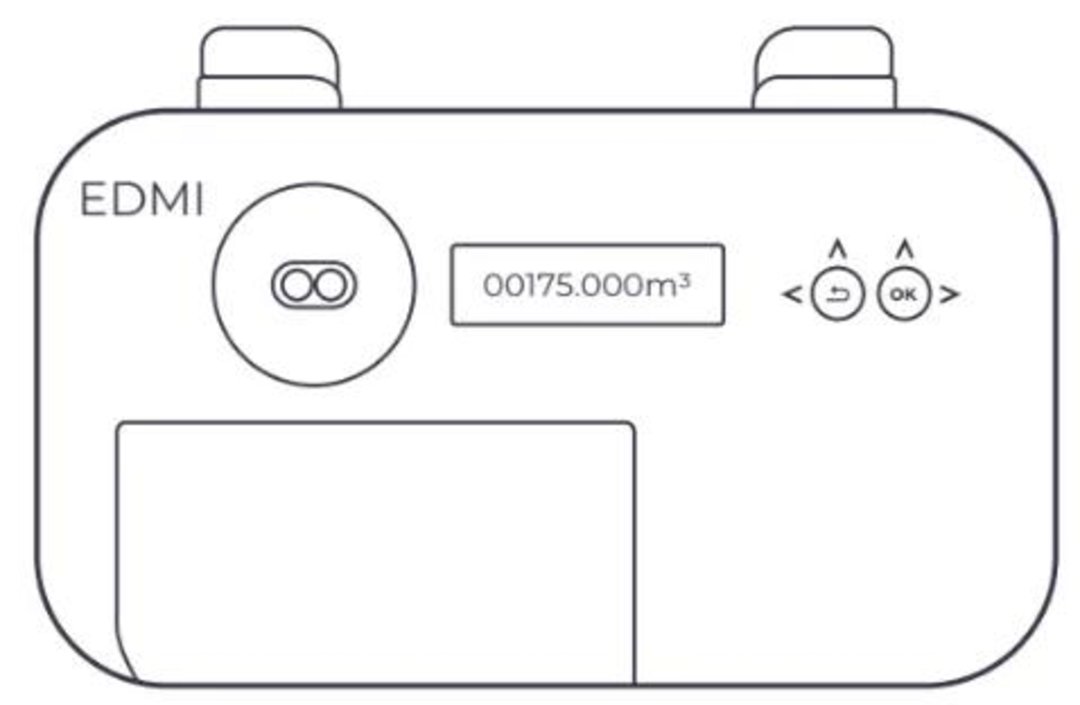
Press and hold any button to wake up the display. Your reading will be on the first screen you see.
Submitting your meter reading
Once you’ve taken your meter readings, the easiest way to send them to us is through the OVO Energy app or your online account. You can also find information on other ways to send your reading.
Ask the OVO Forum
Can’t find an answer? Try asking our helpful OVO community.